How to Add Team Module for Beaver Builder Without Coding?
Creating an inclusive “Meet the Team Page” has become easier than ever before! Xpro team module for Beaver Builder offers user-friendly, and powerful design features, allowing you to effectively add team members’ blocks to WordPress pages.
Enhance your website’s visual appeal with this amazing team module and let it speak highly of your brand and credibility. You can use 14+ layout styles, customize the social icons, add innovative shadows, insert loads of social media links, add hover effects, and more! This drag-and-drop module is incredibly easy to use and it requires no coding! Best part? Even if you don’t know anything about programming languages, you can still create mesmerizing team pages with this module.
Visit our blog to learn more about this free team module for Beaver Builder.
In this guide, we’ve listed down the steps of adding the team module to Beaver Builder from scratch. So, let’s begin.
Requirements
To get started, you need to have a WordPress account and Xpro Addons for Beaver Builder – Lite installed. You can install the Addons directly through the WordPress directory or by uploading a plugin file.
Steps to Adding Team Module for Beaver Builder on WordPress
To add the team module via Beaver Builder on WordPress, follow the steps given below:
Step 1: Locate the Team Module and Drag and Drop it Onto the Screen
Select the page where you’d like to add the Beaver Builder team module. Once you’re in, click on “Module” from the drop-down menu. Then, change the “Group” from the standard module to “Xpro Addons”. Next, locate the “Team Module” and simply, drag and drop it onto the page.

The Xpro Team module has been added to the WordPress page. Now, you’re ready to insert team information, customize the backgrounds, stylize the images, and add hover effects. Let’s start with inserting the basic team member’s information.
Step 2: Add Team Member’s Information (Select “General”)
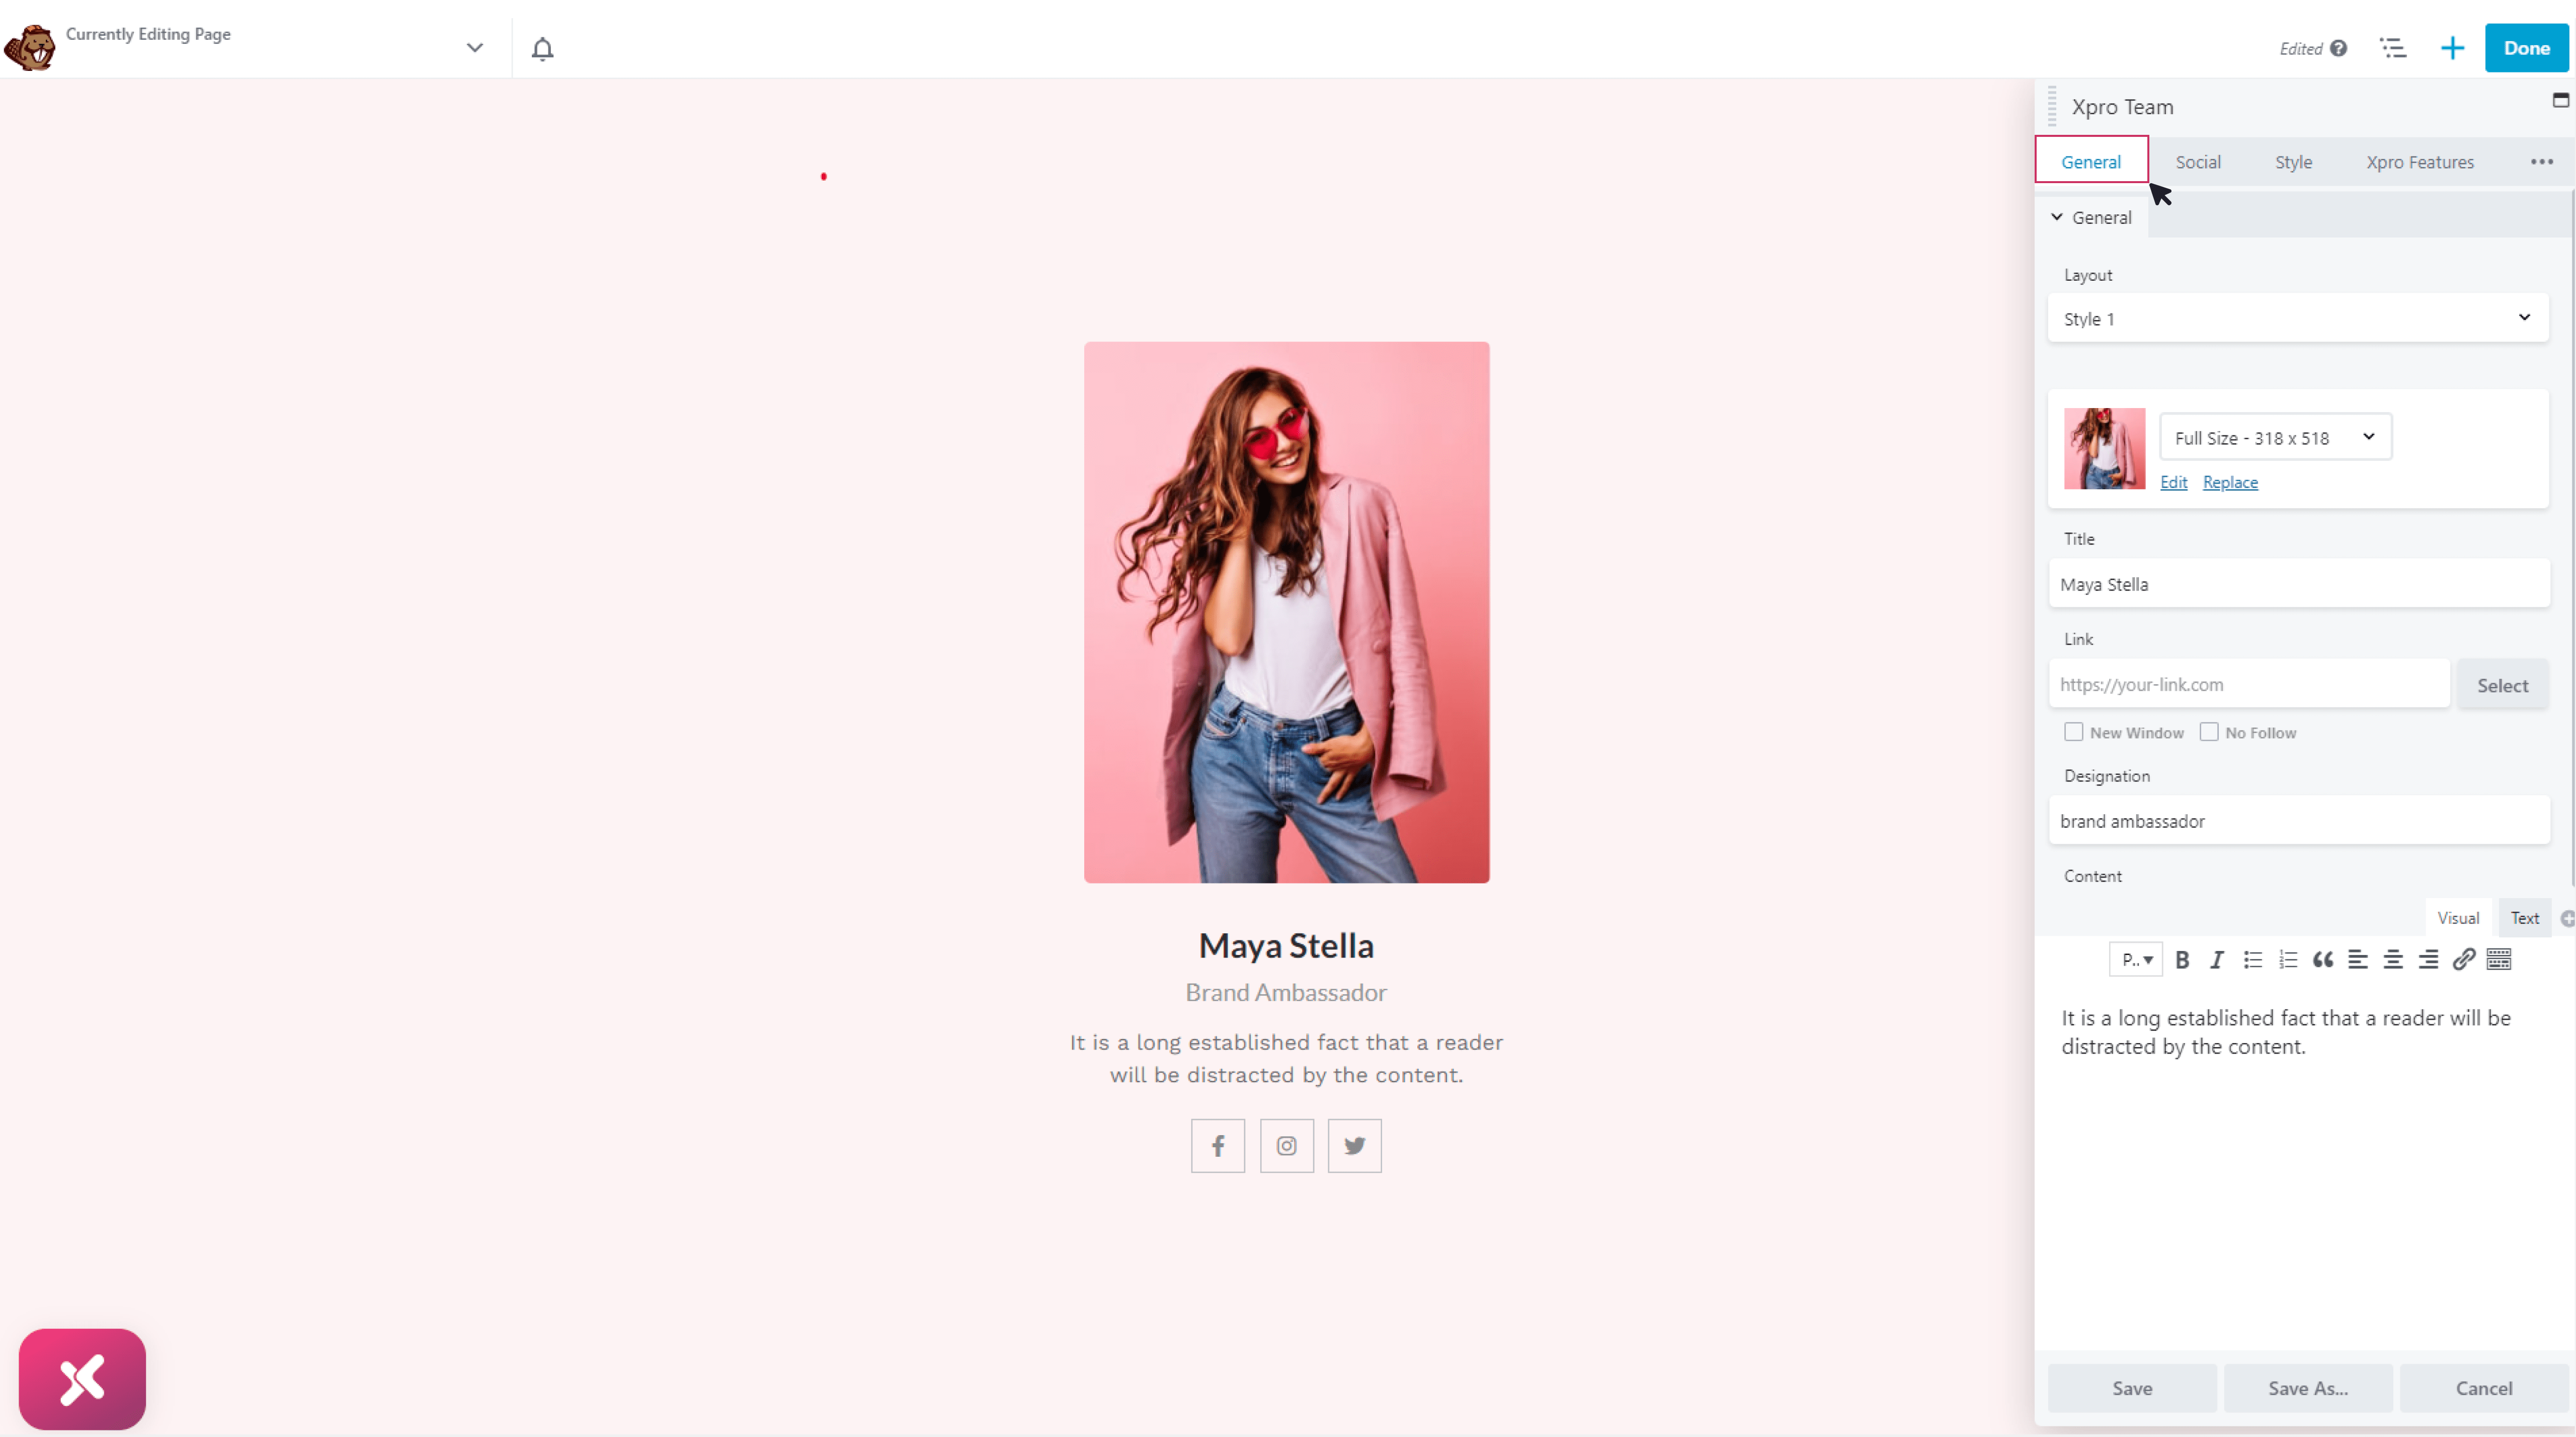
Click on “General” from the customization panel to customize the module and add the following information:
Layout
The layout option allows you to stylize your entire module. From the 14+ styles, you can choose any style and make your module look more appealing.
Select Photo
By simply clicking on “Select Photo”, you’ll be able to add the team member’s image. If the image is already saved in your WordPress media library, simply choose from there or upload a new one.
Title
Insert the employee’s full name in the empty bar provided below the “Title” heading.
Link
Here you can insert the main profile link where you want your audience to be redirected after clicking on the employee’s profile.
Designation
Insert the designation of your employee.
Content
Add a short description or introduction of your employee. Stylize the description with the provided formatting options. You can utilize the bold, italics, bullets, quotation marks, alignments, attach links, and paragraph formatting options.
Alignment
With this, you can adjust the alignment of the entire module. The options you can avail are: left align, center align, and right align.

Step 3: Insert Employee’s Social Media Links (Select “Social”)
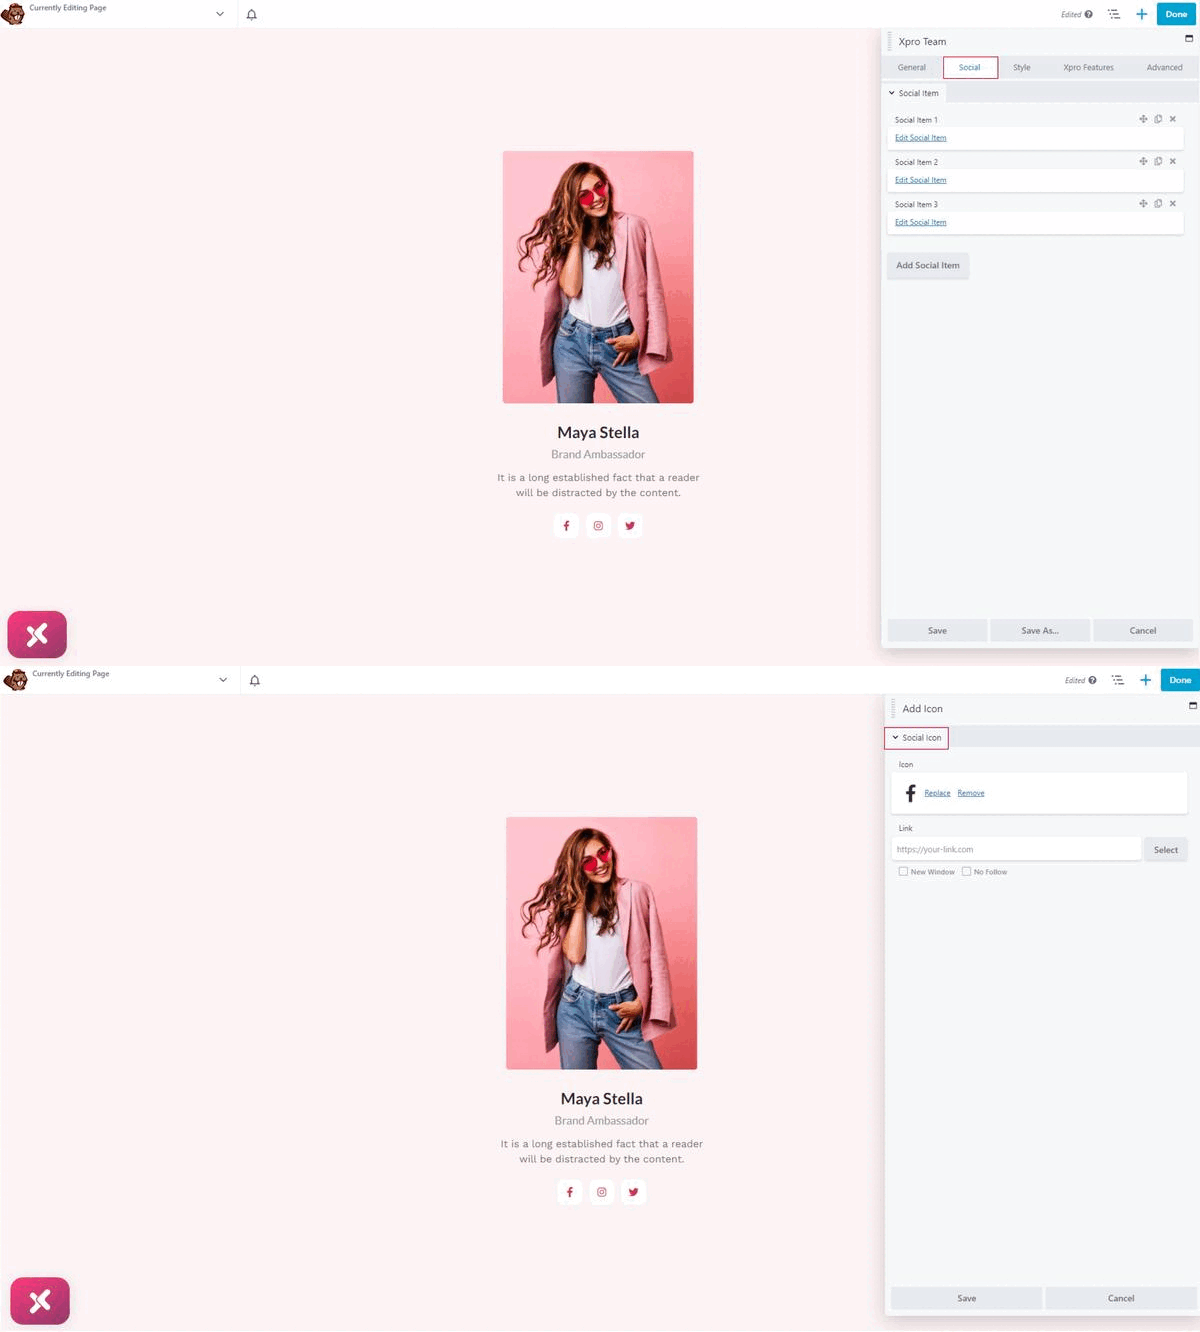
The amazing part of using the Xpro team module for Beaver Builder is that you can add plenty of social media account links. Select “Social” from the customization panel and click on “Social Item 1” to add the first link, on “Social Item 2” to add the second link, and so on. Once done, click on “Save”.

Step 4: Customize the Module (Click on “Style”)
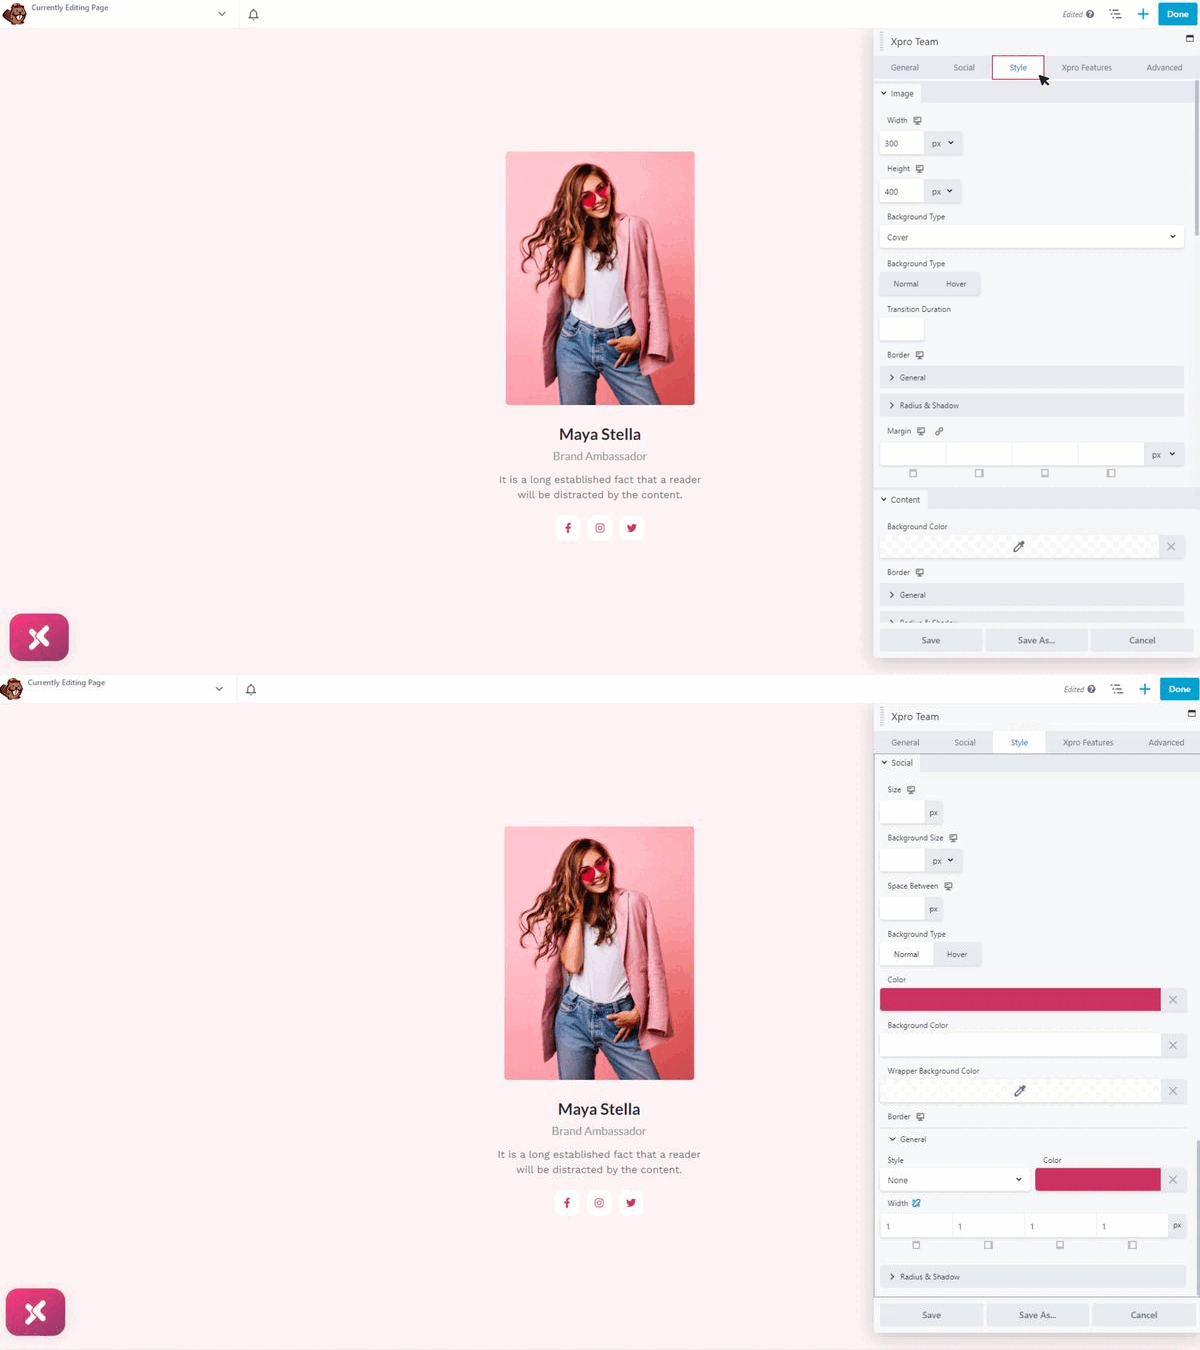
Here you’ll be able to customize the three main parts of your module separately, i.e., image, content, and social icons. The steps for customizing each section are discussed in detail below:
- Image
Setting Image Height and Width
With this option, you can customize the image as you want. Select the width type and adjust the size with the help of the slider and that’s all. The process for adjusting the height is also the same.
Transition Duration
If you want the employee images to move, add the time duration in the box located next to “Duration”. Else, skip this step.
Setting and Customizing Image Border
This team module for Beaver Builder offers multiple border options, i.e., solid, dashed, dotted, and double borders. Locate “Border” on the customization panel and click on “General”. Select the border style, choose your color, insert the width of each side of the border, and save.
What’s more? With the Xpro Beaver Builder team module, you can adjust the border size separately for each side. And, make your team member page more captivating and unique!
Adjusting the radius of the image
Below the general border setting, click on “Radius & Shadow” and insert the size for each side.
Adding shadow behind the image
Locate “Box Shadow”, choose the color, insert X &Y sizes, adjust the blur effect, insert spread size (to position the box-shadow), and save.
Setting Image margins?
Locate “Margins” under the image customization panel and add sizes.
Once you’ve customized the image, you can move on to stylizing the content.
- Content
In order to customize the content, click on “Content”. You can select the background type, adjust the border style/color/width, position the box shadow if needed, adjust the padding of the content box, and more.
How to Stylize the Title of Beaver Builder Team Module?
Under the “Content” in the customization panel, locate “Title” to start customizing the team member’s names or titles. With Xpro team module for Beaver Builder, you can utilize a wide range of formatting options. Adjust the fonts, stylize the text, insert spacing between texts, add text shadows, and set colors/margins.
How to Stylize the Designation of the Beaver Builder Team Module?
Locate “Designation” in the customization panel, under the “Style” section. Insert the required information to stylize the designation of the employee.
How to Stylize the Description of the Beaver Builder Team Module?
Again locate “Description” under the “Style” section and adjust the settings according to your requirements.
Go the extra mile with your design! Get the Xpro Beaver Builder premium pack to add eye-catching animation or floating effects to the team module. Purchase it today and unlock exciting advanced features!
- Social
Lastly, we’ll walk through the steps of customizing social media icons. For this, click “Style” located on the top menu bar from the customization panel, and click on “Social” to continue.
Here is the list of stylization options can you use to customize social icons:
- Adjust logo sizes
- Adjust the background size of the logos
- Adjust the spacing between logos
- Choose the background type: Normal or Hover
- Change the logo and wrapper background colors
- Adjust borders, box shadows, and the radius around the logs

Final Words
Adding the best FREE Xpro Beaver Builder team module is an amazing way to display your employees with style! This module offers you a diverse range of customization options and complete freedom over the features, helping you design pages according to your requirements.
After reading this guide, you might have learned how to add Xpro Beaver Builder Team Module to a WordPress page, as well as how to customize it. You can also get the Xpro Beaver Builder pro pack to unlock Beaver Builder pre-built blocks for team modules!
In case of any queries or suggestions, you can drop us a message or leave a comment below. Our dedicated support team is always here to assist you!
