How To Setup Multilayer Slider For Beaver Builder
Xpro Multilayer Slider comes with its most advanced slider plugin for beaver builder. With a multilayer slider, you can grab the user’s attention with an effective visual appearance. Xpro Multi Layer Slider for beaver builder allows you easy customization of a fantastic full-width, full-screen, or custom slider on the go! Simply import any modern slider templates or create your custom slider from scratch. It’s fun, drag-and-drop based, and saves tons of your time.
Xpro Beaver Builder Multilayer Slider is a fully responsive slider. You can add amazing hover and animation effects to each element of your slides with a touch of unique backgrounds including gradient, image, video, slideshow with parallax effect, and much more!
Let’s dig deep and see how you can fully utilize this awesome module.
Requirements
To create a dynamic slider, you need to install and activate the Beaver Builder and the Xpro multilayer slider plugin. If you already have installed and activated these plugins then just make sure you enable the Xpro features from the Xpro dashboard, so you can easily customize these features to create your own saved row.
Step 1: Drop & Drag Plugin
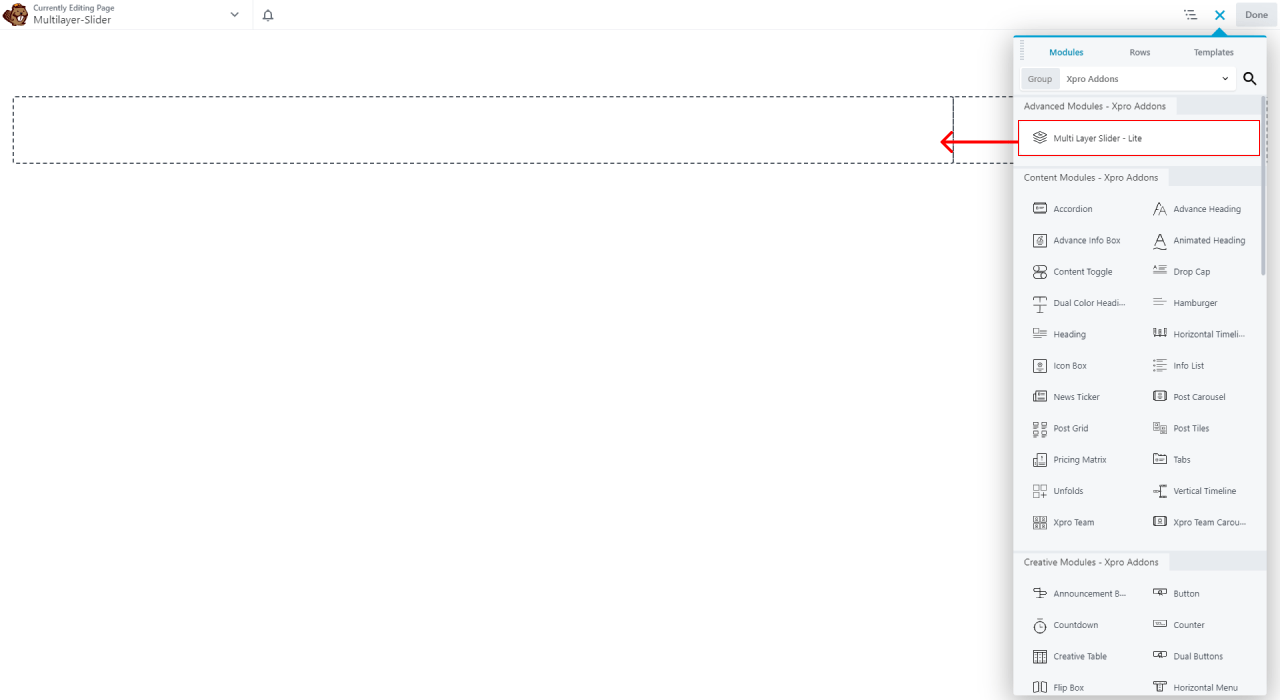
- Click on the Plus Icon in your right corner, and a drop-down list will appear. From the drop-down list, click on the Xpro Addons.

- After selecting Xpro Addons, all Xpro modules will appear, Drop and drag the Multilayer slider to the page selection area.
Step 2: Add & Edit Layer Selection
- After drop’n’drag the module, a Multilayer slider window will appear to edit and style your content slider. You can add multiple slides in your featured slider.
- Xpro Multilayer slider gave you complete freedom to set your layout and add as many slides to create an awesome slider. Click on Add slide button, and on more slides add to your slider.
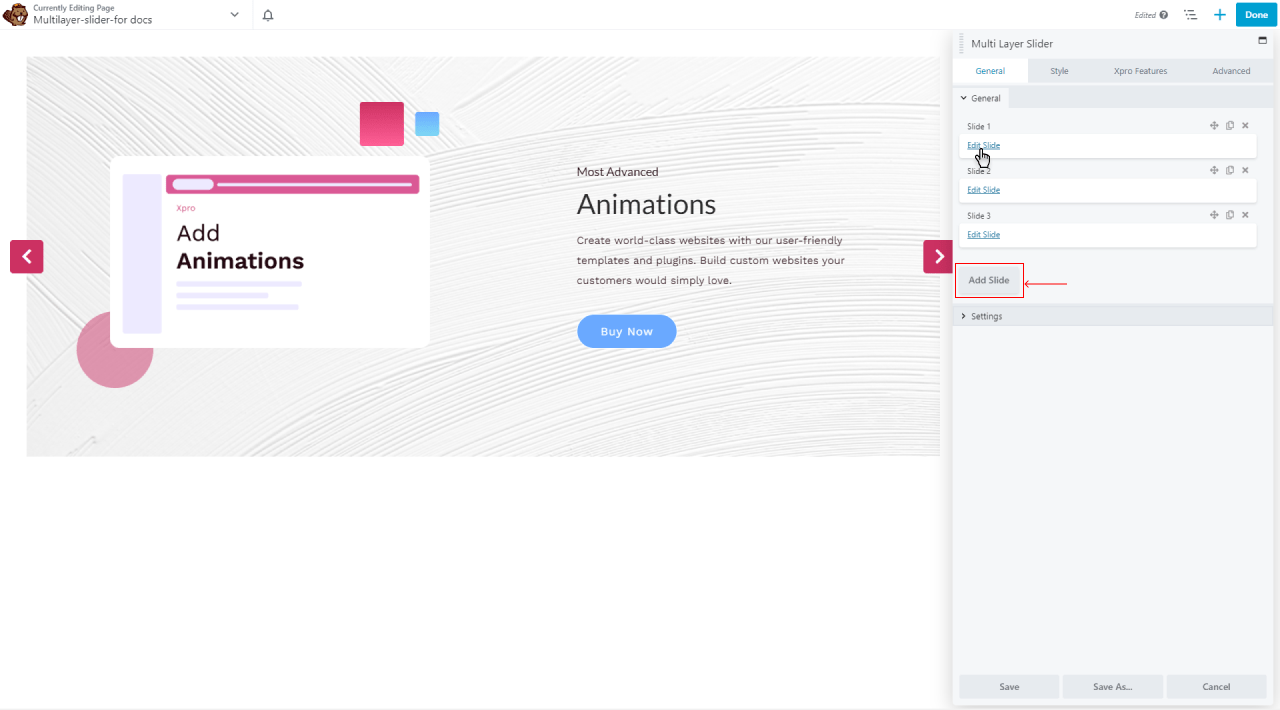
- Click on the edit slide to select the layer that you want to represent on your page.
- You can choose between saved templates and saved rows.
Step 3: Select Slide Type
Xpro Multilayer slider gives the option to customize your content slider with its more advanced types including saved templates and saved rows.
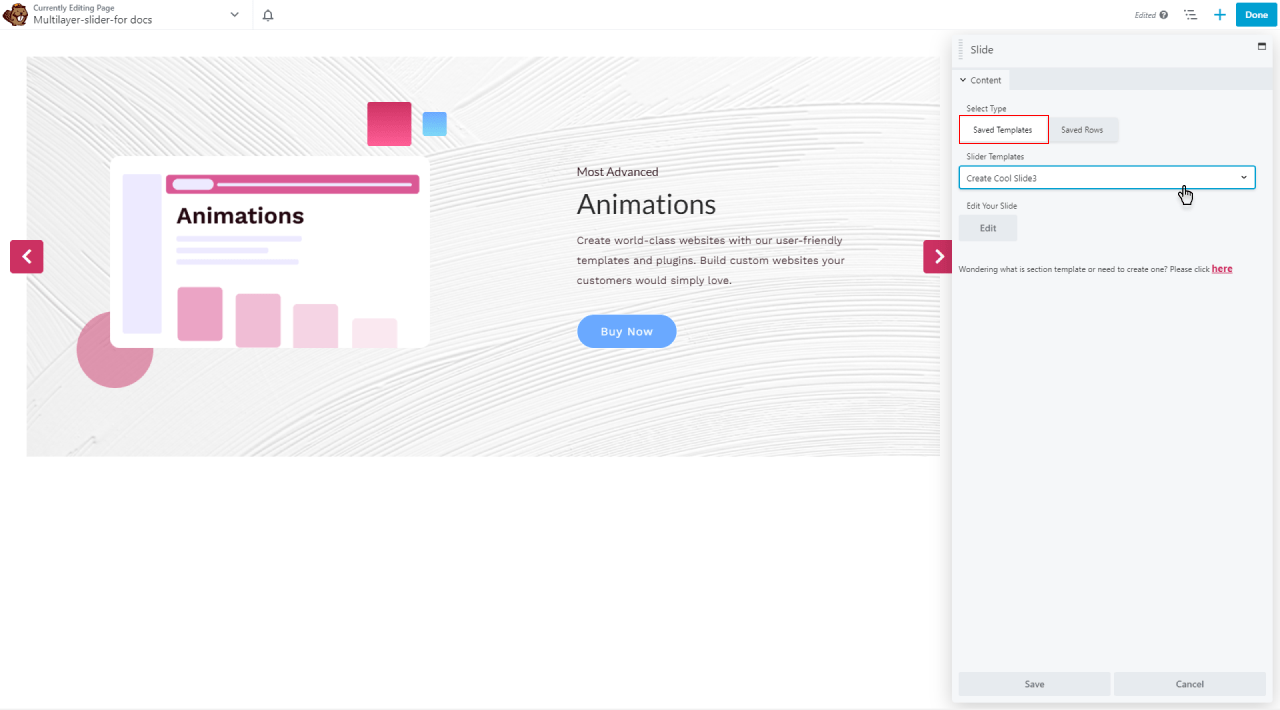
- Saved Templates
Saved templates are the slider templates that you can make with Beaver Builder to use in your slider. Just select your saved template to edit and style in your multilayer slider. You can add or create a new template slide using the Xpro Multilayer Slider.
- Saved Rows
If you are using the Beaver Builder Pro version you can simply edit any row and click on “Save As” and use that Saved Row as your Slide.
Step 4: Edit at Run Time
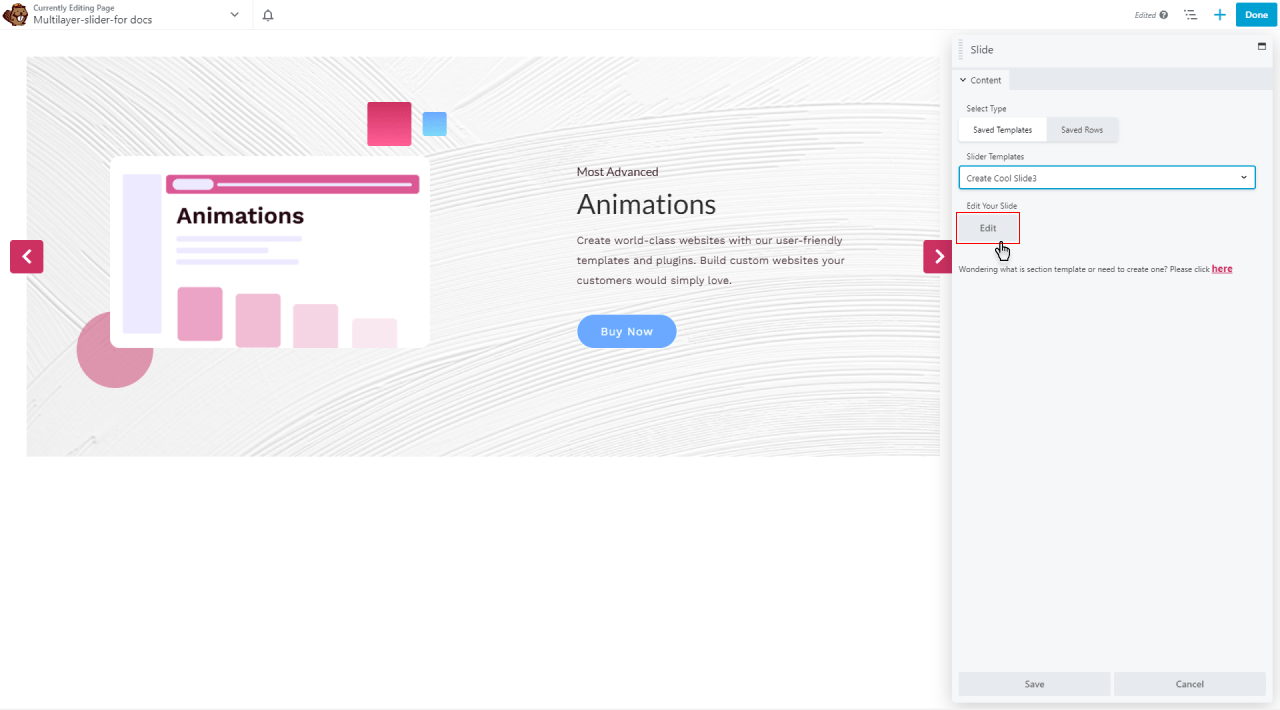
These advanced features make the Xpro multilayer slider more efficient, you can edit your template at run time while making your dynamic content slider. Every completed task need some modifications, so this is a flexibility that allows you to edit slide in no matter of time.
Click on the “Edit” button and edit your selected template at run time and it will directly save it for your slideshow.
Step 5: Slider Setting
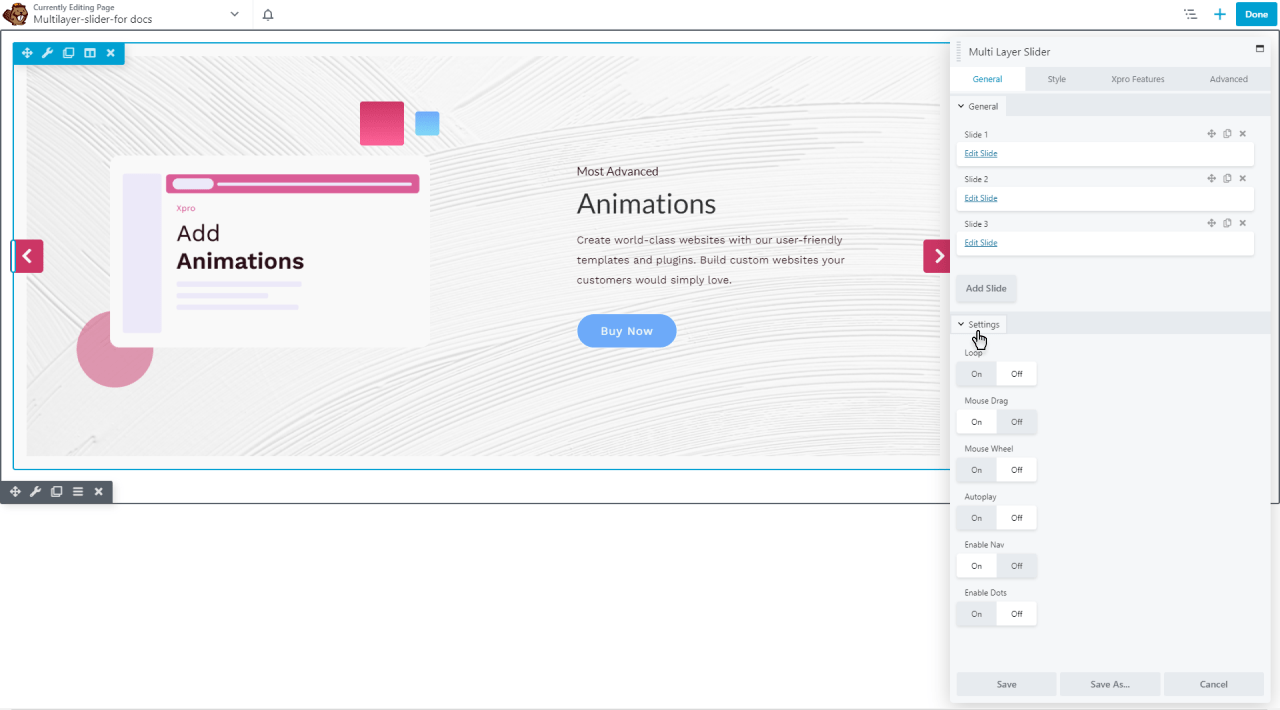
Xpro multilayer slider setting can be reached by clicking on the “Settings” that is shown on the popup window. For this, you can set different options to fully customize your content slider. Here is the list that you can apply on your to enhance your dynamic slideshow.
Loop: This option from which you can choose On or Off. With the loop, the slider will play continuously. Enable the loop by clicking on the “ON” Button.
Mouse Drag: This option allows you to drag your slide with the mouse. It is basically the friction between the mouse button and your finger. Enable this option for the user to drag slides with the help of the mouse.
Mouse Wheel: Point the cursor on the slider and move the mouse wheel to move the slider. Click on the “ON” button to enable this option for the user to drag the slide with the help of the mouse wheel.
AutoPlay: One of the greatest features is the autoplay option. Simply Toggle the auto-play button to “ON” to enable it. It will be your slideshow in one go to the visitor.
Autoplay Timeout: This feature allows you to set the duration of the steady state from the next autoplay session. Set the time manually or drag the sidebar to adjust the steady duration.
Enable Nav: This option from which you can choose On or Off to enable the navigation arrows.
Enable Dots: This option from which you can choose On or Off to enable the navigation dots.
Step 6: Style your Slider
Xpro Multilayer slider gives the customization option to style your dynamic slider. For this, click on the style tab on the pop-up window. To give a pleasant experience to your visitor, you can edit and set the slider styles, navigation arrow, and Dots for navigator styles.
Slider Styles
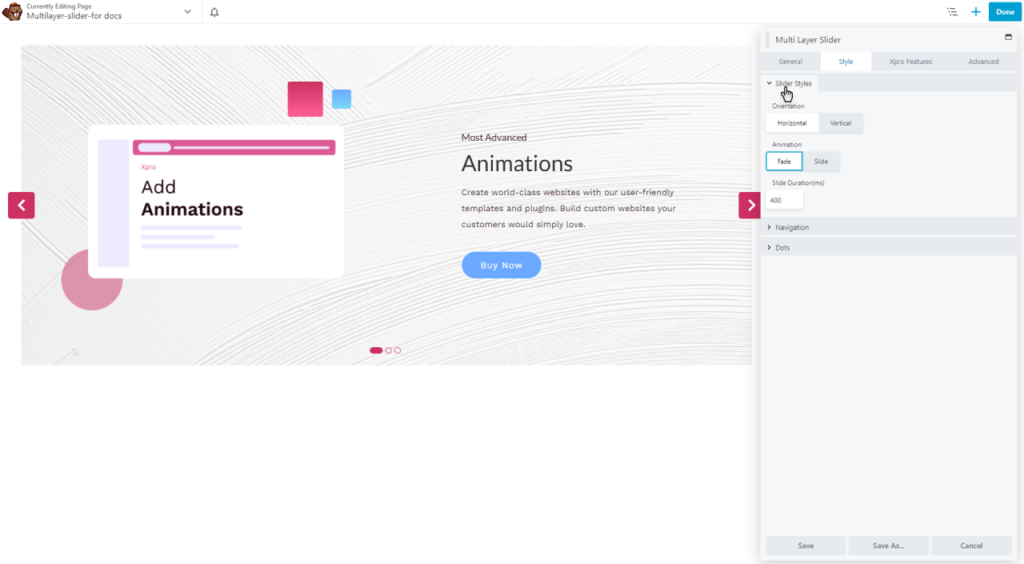
Adding attractive styles to your slides makes your slider look more appealing to your site visitors. Xpro Multi Layer Slider offers 3 premium slider style options for your featured slider that includes orientation, animation, and slide duration with control Effects.
Let’s try the slider styles first.
- Orientation: Set the orientation to horizontal or vertical.
- Animation: Set the animation to fade or slide.
- Slide Duration(ms): Set the slide duration time from the previous to the next slide with an exact number or drag the slide bar.
Navigations
Now let’s style these navigation arrows to give a pleasant experience to your site visitors.
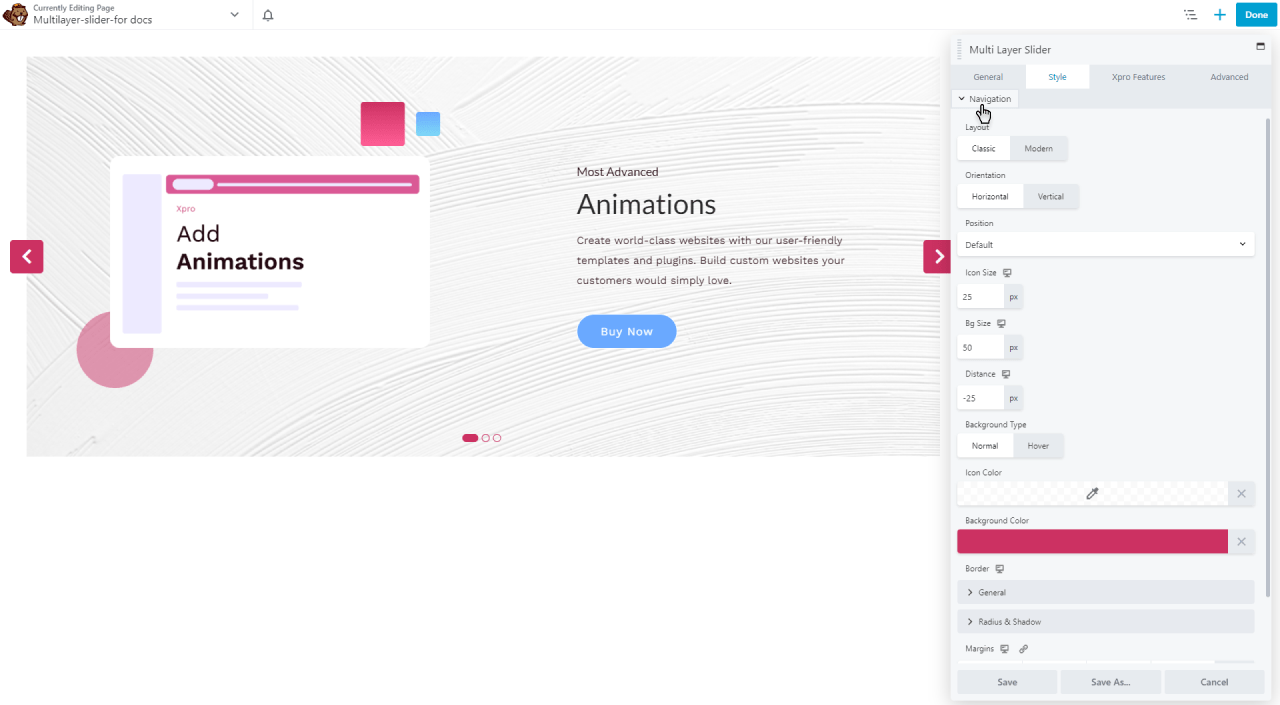
Click on the Style Tab and then open the Navigation section.
Depending on your preference, you can select either Classic or Modern layouts, and customize the navigation icon size, background size, and positioning (10 options) of the navigation arrows respectively. Moreover, you can use any color combination to style these icons most attractively. With Icon Background size and distance can also be customized in the Xpro multilayer slider. You can also add a border, choose from Normal, and Hover also gives a color to it.
Dots
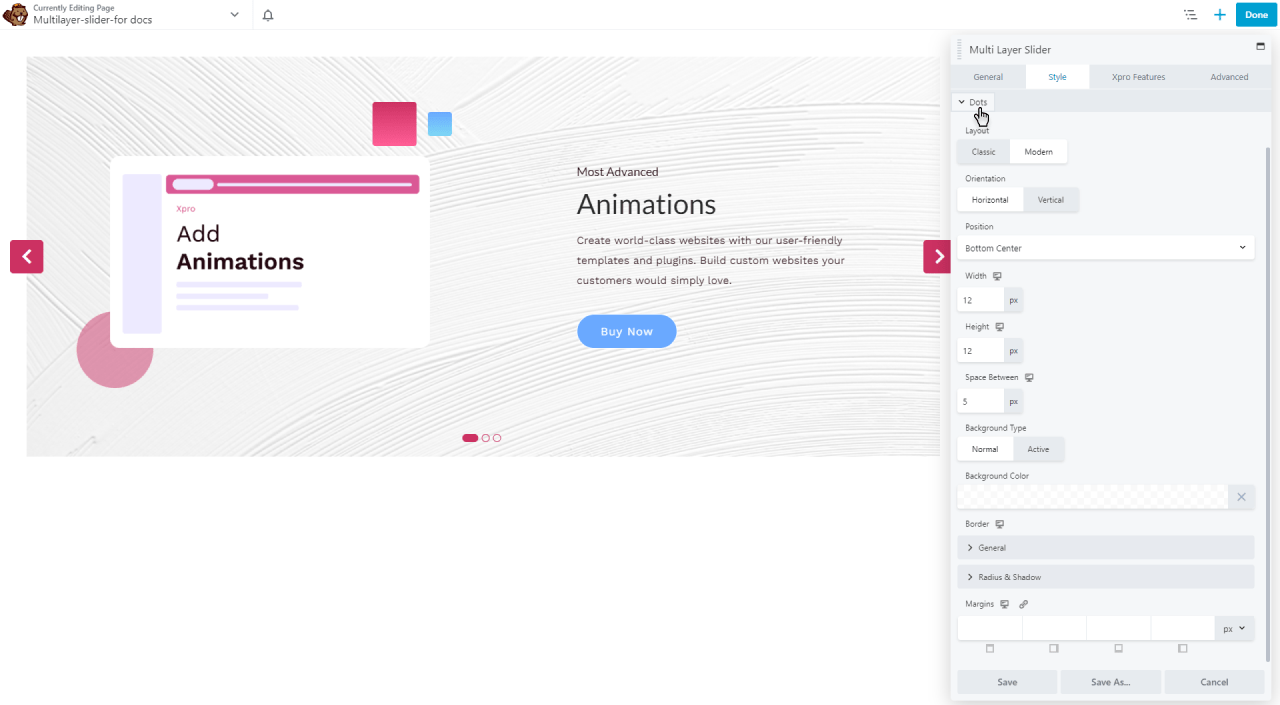
Let’s begin our design process by creating a captivating Dots Navigation by using the Dots tab in the Style Tab. There are a lot of great editing options available in the Dots section of the navigation bar for your dots. The Modern layout is one of two amazing layouts (Classic and Modern).
Your dots can now be oriented (horizontal or vertical) and positioned (8 options are available). The space between your dots can also be adjusted, as well as their height and width. The color of your dots can be changed for both Normal & Active modes, and a prominent border can be added.
Step 7: Publish Your Slider
Once you are done applying your choice styling on the Lottie animation. The only thing left is to save and publish your changes. If you are done with editing, click the Done button and follow the Publish Button.
That’s all, you do with slider animation in WordPress by using the Xpro Multilayer Slider plugin.

Best Multilayer Slider, Create Your Dynamic Slider In No Time
It is explained in this document what some of the most notable features of the Xpro Multi Layer Slider for Beaver Builder are. Once again, if you want to get started quickly, you can import premium slider templates or simply create your own custom slides from scratch. Create a dynamic content slider of any size and embed it anywhere on your WordPress website.
Xpro Beaver Builder addon is loaded with stunning features that include a wide range of modules, features, and theme pages. Get the best Multilayer slider for your WordPress website.
